Extending BloodHound: Track and Visualize Your Compromise
This is the first installment in a series of posts regarding modifications to BloodHound and lessons learned while working with Neo4j & Cypher. Other posts can be found here:
If you’re new to BloodHound, I highly recommend checking out this blog, this video, or this wiki to familiarize yourself. The work being done by _wald0, CptJesus, and harmj0y is changing how red and blue teams approach risk in Active Directory environments.
This post will cover how I’ve adapted BloodHound to enhance my workflow during a penetration test, complete with example usage and a source code release. It’s a bit verbose – I wanted to include why I saw an opportunity for these changes and the process for creating them. If you’d like to skip to the new features then start here.
Custom Queries and database updates can be done independent of the BloodHound application. However, any modifications to BloodHound’s display requires changing BloodHound’s source. A quickstart guide for my Custom Queries and database updates can be found in the BloodHound-Owned GitHub repo. My BloodHound UI enhancements, including node highlighting and custom property display, can be found in this forked BloodHound repo.
- The BloodHound Platform
- Opportunities to Extend BloodHound
- Tracking Compromised Users and Computers
- Finding the Collateral Spread When a Node is Compromised
- Showing Changes in Privilege Gains
- Automating the Workflow
- UI Customizations and Custom Queries
- Next Steps
The BloodHound Platform
Out of the box, BloodHound works like a champ. The interface is slick, the install is painless enough considering the dependencies, and the pre-built analytics deliver actionable intelligence. What’s important to note though is that BloodHound isn’t necessarily just a tool, it’s a platform for users to build on. The foundational elements – a reliable backend, a means for ingesting, querying, and displaying data – are already taken care of. The piping is in place for users to extend the already-great features and tailor it to their specific job function or workflow.
My workflow stems from being a penetration tester. The value derived from BloodHound on an engagement for me is obvious – I can quickly identify those complex attack paths that otherwise would have taken OVER 9000 BILLABLE HOURS to discover. Not only that, BloodHound serves as a tremendous debriefing aide when walking a client through your critical path to compromise (Seriously, clients love it. It’s interactive, it gives a tangible view of the network to less technical people, and it’s not Powerpoint.)
Whenever I obtain a new account or pop a shell on an engagement, one of the first things I do is run over to BloodHound and fire up the Pathfinding feature. I input the User’s/Computer’s name as my source and select Domain Admins as my target. The query only returns data when a path exists – awesome when it happens, but disappointing when it comes back empty. This process is a little tedious, and it lacks showing me the true privilege gains that come along with obtaining a new account/computer. This looked like an opportunity to add in a feature that could make my life easier as a penetration tester.
Opportunities to Extend BloodHound
As I contemplated how to add this functionality into BloodHound, I thought more about my workflow and how compromises often unfold. Privilege gains during a penetration test usually happen in waves. For example, an assessment might start out like:
- Intercept LLMNR requests, collect and crack NTLMv2 hashes. 2 accounts obtained.
- Password spray with “Spring2017!” against domain users. 4 more accounts obtained.
- Use Mimikatz to dump passwords from SQLSRV01. 3 more accounts obtained.
- Pass SQLSRV01 local administrator hash against other hosts. 34 computers obtained.
Obviously this process varies depending upon the environment, but the framework holds. We start with no credentials, and gradually our sphere of compromise increases as we control more assets.
Let’s use BloodHound to answer a simple question: When a new set of nodes are owned by some method, what other nodes can we now collaterally reach? Let’s call this our wave of compromise. Maybe one of the nodes in that wave has a path to Domain Admins that isn’t yet represented by a BloodHound relationship.
We’ll leverage this notion, that a node can be “owned” during a “wave” of compromise, to build some useful features.
Tracking Compromised Users and Computers
Going deeper means understanding a little bit about Neo4j and it’s query language, Cypher. I highly recommend reading Rohan Vazarkar’s Intro to Cypher blog post, as I’ll skip over some of the introductory concepts. Rohan covers BloodHound’s current node and relationship structure, as well as some of the core analytics currently packed into BloodHound.
In it’s current version, BloodHound stores one property for each node: name. Depending on the type of node, this will be one of:
- User’s name ([email protected])
- Computer’s name (SYSTEM38.INTERNAL.LOCAL)
- Group’s name (DOMAIN [email protected])
- Domain’s name (INTERNAL.LOCAL)
To track owned Users and Computers, we’ll set two new properties on relevant nodes:
owned- The method used to compromise this node (ex: LLMNR, Mimikatz, Password reuse, etc.)wave- The number representing the order in which this node was owned (ex: 1, 2, 3, etc.)
These properties can be added to a specified node using Cypher. The two simplest options for issuing ad-hoc Cypher queries are BloodHound’s Raw Query feature (at the bottom of the app), and Neo4j’s web browser (http://localhost:7474/). I recommend using Neo4j’s web browser to tinker with queries since you get some nifty syntax highlighting and debugging tools. Here’s the Cypher syntax for adding the properties to a specified node:MATCH (n) WHERE n.name="[email protected]" SET n.owned="LLMNR wpad", n.wave=1
Now a query for [email protected] reflects the added properties:MATCH (n) WHERE n.name="[email protected]" RETURN n
+-------------------------------+
| n |
+-------------------------------+
| owned | LLMNR wpad |
| name | [email protected] |
| wave | 1 |
+-------------------------------+
By making a few additions to the source, we can even integrate these properties into the Node Info tab of BloodHound’s UI: 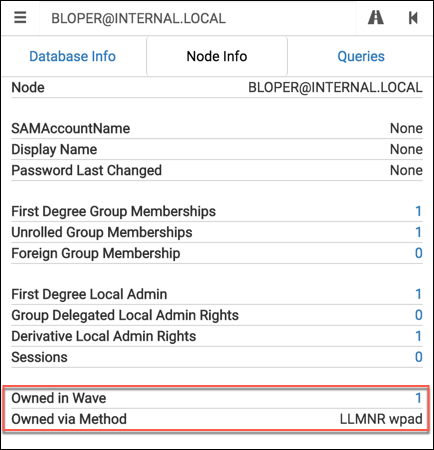
It’s a useful way to document your compromise as you go, and a convenient visual aide when explaining your critical path of compromise to a client.
Note that modifications to the UI like this are only possible if you tweak BloodHound’s source. I’m compiling all of my UI enhancements into a GitHub repo – if you want to try out these additions yourself then you’ll need to install the customized app from the repo.
For those interested, here’s a sample of the changes made to src/components/SearchContainer/Tabs/UserNodeData.jsx to make this happen (diff here):var s8 = driver.session()
var s9 = driver.session()
...
s8.run("MATCH (n {name:{name}}) RETURN n.wave", {name:payload})
.then(function(result){
if (result.records[0]._fields[0] != null) {
this.setState({'ownedInWave':result.records[0]._fields[0].low})
}
s8.close()
}.bind(this))
s9.run("MATCH (n {name:{name}}) RETURN n.owned", {name:payload})
.then(function(result){
if (result.records[0]._fields[0] != null) {
this.setState({'ownedMethod':result.records[0]._fields[0]})
}
s9.close()
}.bind(this))
...
<dt>
Owned in Wave
</dt>
<dd>
<NodeALink
ready={this.state.ownedInWave !== -1}
value={this.state.ownedInWave}
click={function(){
emitter.emit('query', "OPTIONAL MATCH (n1:User {wave:{wave}}) WITH collect(distinct n1) as c1 OPTIONAL MATCH (n2:Computer {wave:{wave}}) WITH collect(distinct n2) + c1 as c2 OPTIONAL MATCH (n3:Group {wave:{wave}}) WITH c2, collect(distinct n3) + c2 as c3 UNWIND c2 as n UNWIND c3 as m MATCH (n)-[r]->(m) RETURN n,r,m", {wave:this.state.ownedInWave}
,this.state.label)
}.bind(this)} />
</dd>
<dt>
Owned via Method
</dt>
<dd>
{this.state.ownedMethod}
</dd>
Finding the Collateral Spread When a Node is Compromised
When we designate a node as owned, we want to see the ripple effect across the network. With our wave property set, we can find those outbound paths like this:MATCH (n)-[r*]->(m) WHERE n.wave=1 RETURN n,r,m
This is similar to the “Find Shortest Paths to Here” idea, but we’re now interested in the paths branching out of a node instead of those coming in. For each new node in the paths we find, we’ll set the wave property equal to the same wave value of the source node(s).
Let’s see this idea in action with the example graphdb included in the BloodHound repo. If you’d like to follow along, I recommend working with a copy of the example graphdb to make starting fresh easier.
We’ll start our theoretical penetration test by firing up Responder and grabbing some NTLMv2 hashes. Assume we were able to crack the hashes and obtain cleartext passwords for two accounts, [email protected] and [email protected]. Let’s mark those two accounts as compromised using Cypher:// Adding [email protected] to wave 1 via LLMNR wpad
MATCH (n) WHERE n.name="[email protected]" SET n.owned="LLMNR wpad", n.wave=1
> Set 2 properties, statement completed in 5 ms.
// Adding [email protected] to wave 1 via NBNS wpad
MATCH (n) WHERE n.name="[email protected]" SET n.owned="NBNS wpad", n.wave=1
> Set 2 properties, statement completed in 6 ms.
// Show names of nodes from the first wave
MATCH (n) WHERE n.wave=1 RETURN n.name
+-------------------------+
| n.name |
+-------------------------+
| [email protected] |
| [email protected] |
+-------------------------+
With these two nodes as our source, let’s use BloodHound’s Raw Query feature to find the other nodes collaterally included in this wave of compromise: 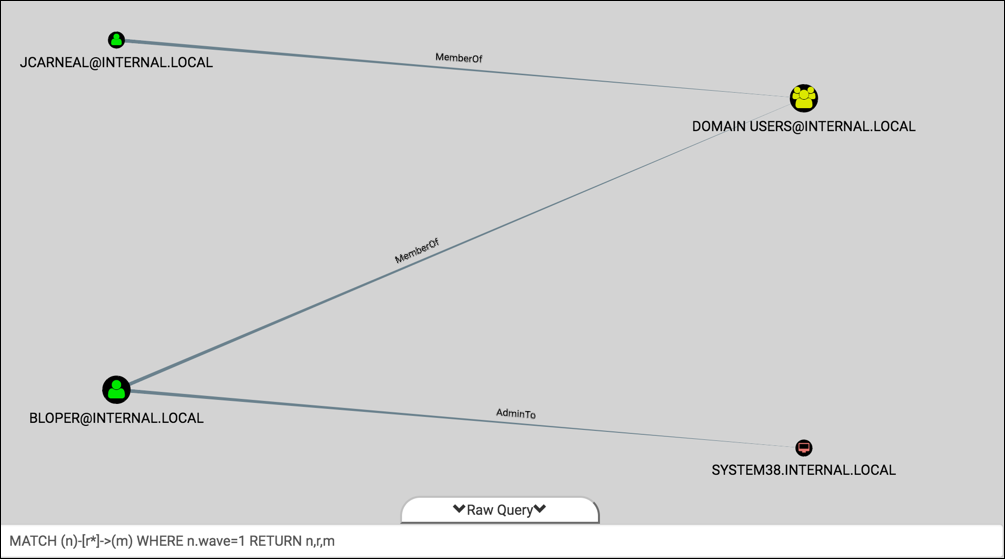
We see two additions – both users are a MemberOf “DOMAIN [email protected]”, and one user is AdminTo “SYSTEM38.INTERNAL.LOCAL”. Neat. Go ahead and add both of those nodes to wave 1 as well:MATCH (n)-[r*]->(m) WHERE n.wave=1 SET m.wave=1
> Set 3 properties, statement completed in 5 ms.
// Show updated names of nodes from the first wave
MATCH (n) WHERE n.wave=1 RETURN n.name
+-----------------------------+
| n.name |
+-----------------------------+
| [email protected] |
| DOMAIN [email protected] |
| [email protected] |
| SYSTEM38.INTERNAL.LOCAL |
+-----------------------------+
Simple enough, right? Let’s build on these queries.
Showing Changes in Privilege Gains
We have a way for marking nodes as owned, and we can view the ripple effect of a wave. What happens when we compromise a disjoint set of nodes via some new method? What does the delta in our access look like? It would be terrific if we could see what’s available to us now that wasn’t available to us before.
We can use the same queries as before, but we’ll want to be careful not to overwrite data from previous waves. How do we know which nodes we compromised in previous waves? Each compromised node has a wave property that already exists. If we detect that this property exists, then we know not to include it in the new wave. This can be done in Cypher by negating the EXISTS function:MATCH (n)-[r*]->(m) WHERE n.wave=2 AND not(EXISTS(m.wave)) SET m.wave=2
We’re still looking for the paths branching out (except using the second wave as our starting point), but we don’t want to circle back to nodes we’ve already compromised. The clause AND not(EXISTS(m.wave)) ensures we don’t include any destination nodes with the wave property set.
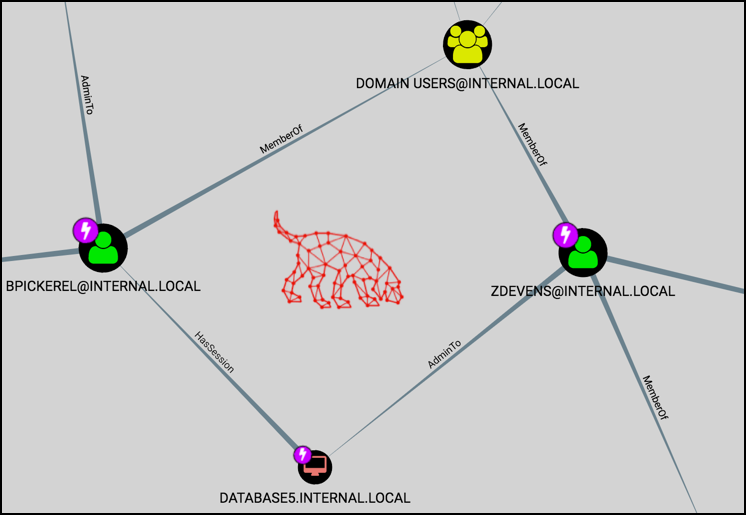
Let’s see it in context by building off of the previous example. Imagine that the next step of our penetration test involved a password spraying attack against domain users. We found two users with “Spring2017!” on the INTERNAL.LOCAL domain, ZDEVENS and BPICKEREL. Start by marking these two new nodes as owned in wave 2:// Adding [email protected] to wave 2 via Password spray
MATCH (n) WHERE n.name="[email protected]" SET n.owned="Password spray", n.wave=2
> Set 2 properties, statement completed in 7 ms.
// Adding [email protected] to wave 2 via Password spray
MATCH (n) WHERE n.name="[email protected]" SET n.owned="Password spray", n.wave=2
> Set 2 properties, statement completed in 5 ms.
Find the spread of compromise, then add those nodes to our second wave:MATCH (n)-[r*]->(m) WHERE n.wave=2 AND not(EXISTS(m.wave)) SET m.wave=2
> Set 6 properties, statement completed in 3 ms.
And now the graph showing the second wave. This represents the delta after our password spraying attack: 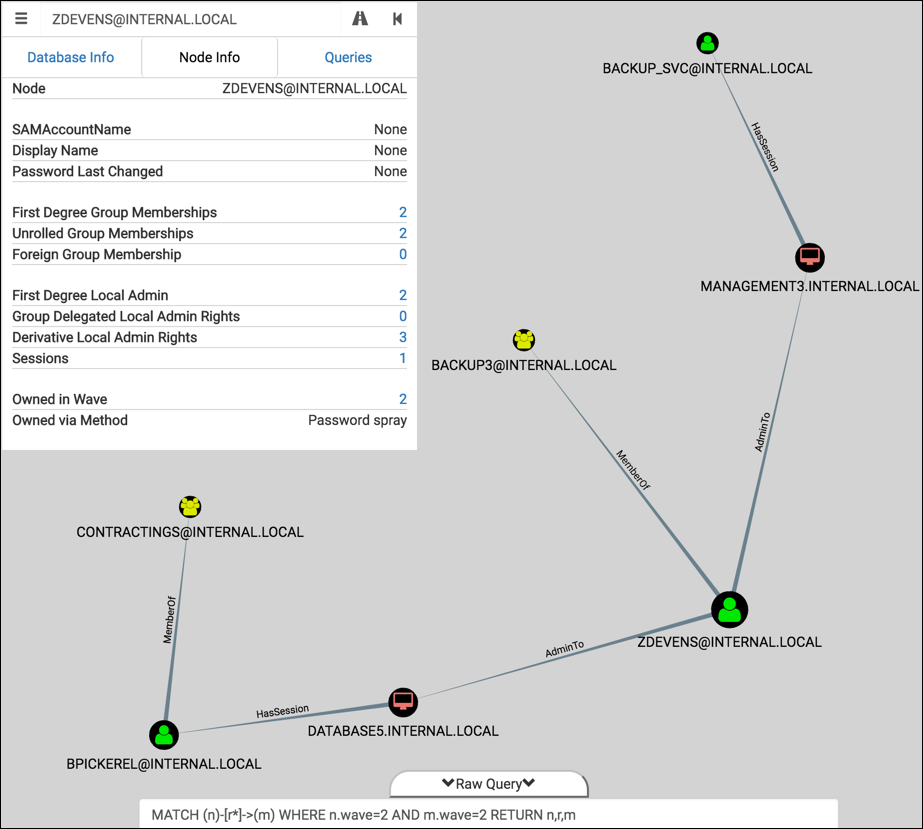
That’s handy. Now I know which machines I should go plunder for sensitive documents, local hashes, cached passwords, etc.
Automating the Workflow
It’s tedious to manually run these queries each time a node is compromised. Thankfully, Neo4j’s REST API makes automation possible. With a simple Ruby script, we can leverage the same endpoint used by Export-BloodHoundData to ingest data directly across the network:$ ruby bh-owned.rb
Usage: ruby bh-owned.rb [options]
-u, --username <username> Neo4j database username (default: 'neo4j')
-p, --password <password> Neo4j database password (default: 'BloodHound')
-U, --url <url> URL of Neo4j RESTful host (default: 'http://127.0.0.1:7474/')
-n, --nodes get all node names
-a, --add <file> add 'owned' and 'wave' property to nodes in <file>
-w, --wave <num> value to set 'wave' property (override default behavior)
-e, --examples reference doc of customized Cypher queries for BloodHound
I usually start by dumping all of the nodes from the database with -n:$ ruby bh-owned.rb -n
[*] Using default username: neo4j
[*] Using default password: BloodHound
[*] Using default URL: http://127.0.0.1:7474/
[email protected]
[email protected]
[email protected]
[email protected]
[email protected]
[email protected]
[email protected]
<snipped>
With -e, you can see some of the useful Cypher queries used throughout this blog post (some are slightly modified to improve query performance):$ ruby bh-owned.rb -e
Find all owned Domain Admins:
MATCH (n:Group) WHERE n.name =~ '.*DOMAIN ADMINS.*' WITH n MATCH p=(n)<-[r:MemberOf*1..]-(m) WHERE exists(m.owned) RETURN nodes(p),relationships(p)
Find Shortest Path from owned node to Domain Admins:
MATCH p=shortestPath((n)-[*1..]->(m)) WHERE exists(n.owned) AND m.name=~ '.*DOMAIN ADMINS.*' RETURN p
List all directly owned nodes:
MATCH (n) WHERE exists(n.owned) RETURN n
Find all nodes in wave $num:
MATCH (n)-[r]->(m) WHERE n.wave=$num AND m.wave=$num RETURN n,r,m
Show all waves up to and including wave $num:
MATCH (n)-[r]->(m) WHERE n.wave<=$num RETURN n,r,m
Set owned and wave properties for a node (named $name, compromised via $method in wave $num):
MATCH (n) WHERE (n.name = '$name') SET n.owned = '$method', n.wave = $num
Find spread of compromise for owned nodes in wave $num:
OPTIONAL MATCH (n1:User {wave:$num}) WITH collect(distinct n1) as c1 OPTIONAL MATCH (n2:Computer {wave:$num}) WITH collect(distinct n2) + c1 as c2 UNWIND c2 as n OPTIONAL MATCH p=shortestPath((n)-[*..20]->(m)) WHERE not(exists(m.wave)) WITH DISTINCT(m) SET m.wave=$num
Continuing with our theoretical penetration test, let’s say that we found a juicy Excel spreadsheet which contained credentials for users [email protected] and [email protected]. We’ll first create a CSV with the node names and method of compromise like so:$ cat 3rd-wave.txt
[email protected],Creds in file on DATABASE5
[email protected],Creds in file on DATABASE5
Then we use the -a flag to ingest:$ ruby bh-owned.rb -a 3rd-wave.txt
[*] Using default username: neo4j
[*] Using default password: BloodHound
[*] Using default URL: http://127.0.0.1:7474/
[+] Adding [email protected] to wave 3 via Creds in file on DATABASE5
[+] Adding [email protected] to wave 3 via Creds in file on DATABASE5
[+] Querying and updating new owned nodes
The script will first query the database and determine the latest wave added – in this case it was ‘2’. It then increments it by one so that the incoming additions will be in wave ‘3’. You can override this behavior by setting the -w flag to the preferred wave value.
Once the wave number is determined, the script takes the following steps:
- Creates the Cypher queries to set properties on the owned nodes
- Creates the Cypher query to find the spread of compromise for the new wave
- Wraps it all in JSON
- POSTs the request to the REST endpoint
Let’s look at the result for this third wave in BloodHound: 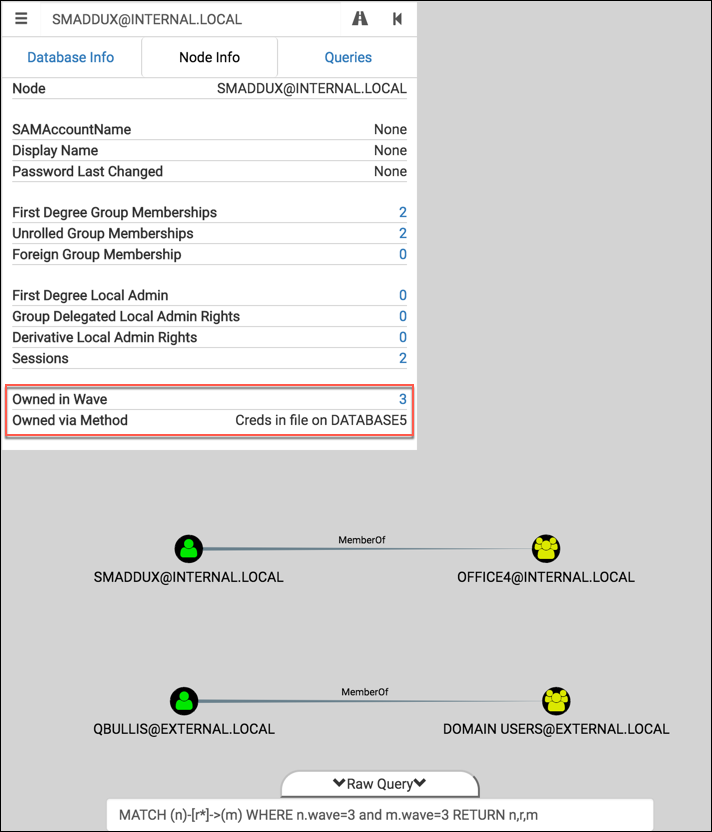
Turns out this wave wasn’t very exciting ¯\_(ツ)_/¯ And we still have to type in our custom query in order to display the graph in BloodHound. Let’s remove that hassle and take it a step further by tweaking the UI and writing some custom queries.
UI Customizations and Custom Queries
BloodHound added a feature in v1.2 to allow for custom queries (more info on CptJesus’s blog). This has the same effect as adding a pre-built query on the Queries tab, but the configuration file has been decoupled from the project’s source code. I found this file in OS X at ~/Library/Application Support/bloodhound/customqueries.json.
I’ve added four custom queries (source here): 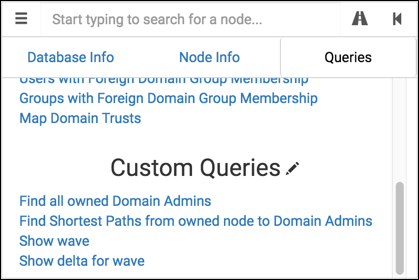
- Find all owned Domain Admins: Same as the “Find all Domain Admins” query, but instead only show Users with
ownedproperty. - Find Shortest Paths from owned node to Domain Admins: Same as the “Find Shortest Paths to Domain Admins” query, but instead only show paths originating from an
ownednode. - Show wave: Show only the nodes compromised in a selected wave. Useful for focusing in on newly-compromised nodes.
- Show delta for wave: Show all compromised nodes up to a selected wave, and will highlight the nodes gained in that wave. Useful for visualizing privilege gains as access expands.
If you’re using the customized BloodHound app, these queries will highlight nodes of interest in the graph as well. Let’s see the custom queries and UI enhancements in context of our example penetration test:
Find all owned Domain Admins
Let’s add two more nodes to our compromise:$ cat 4th-wave.txt
[email protected],Mimikatz on MANAGEMENT3
FILESERVER6.INTERNAL.LOCAL,Local Administrator password reuse (dumped from MANAGEMENT3)
$ ruby bh-owned.rb -a 4th-wave.txt
[*] Using default username: neo4j
[*] Using default password: BloodHound
[*] Using default URL: http://127.0.0.1:7474/
[+] Adding [email protected] to wave 4 via Mimikatz on MANAGEMENT3
[+] Adding FILESERVER6.INTERNAL.LOCAL to wave 4 via Local Administrator password reuse (dumped from MANAGEMENT3)
[+] Querying and updating new owned nodes
And now click on the “Find all owned Domain Admins” custom query: 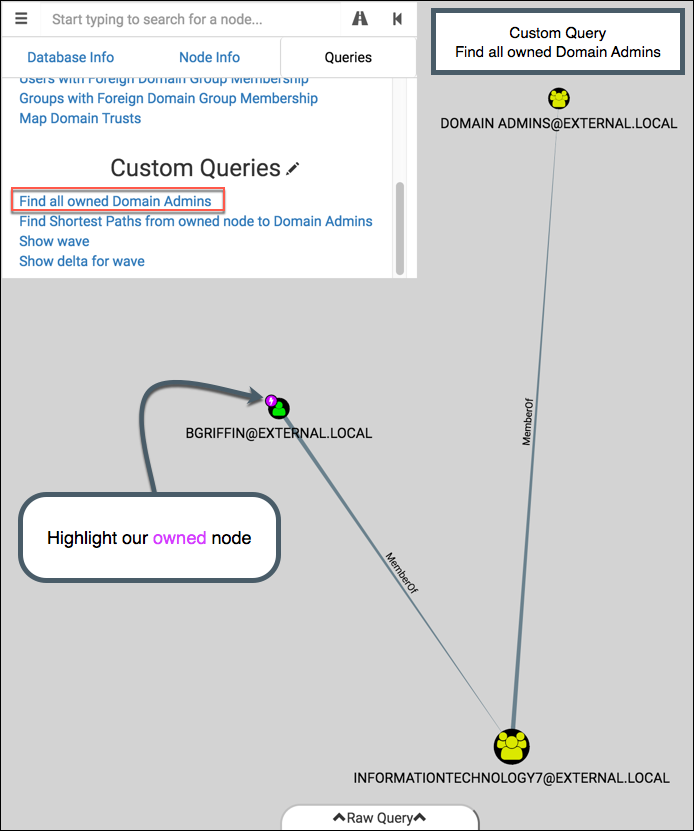
Boom, we got one. Notice that a magenta lightning bolt appears on the top-left of nodes relevant to our custom query. Like the additions to the Node Info tab, this feature is currently only available in the modified version of BloodHound.
Find Shortest Paths from owned node to Domain Admins
This is the same as the “Find Shortest Paths to Domain Admins”, but we’re focusing on nodes we’ve owned. You’ll see in this graph that the two starting nodes, FILESERVER6 and BGRIFFIN, are marked with our owned icon: 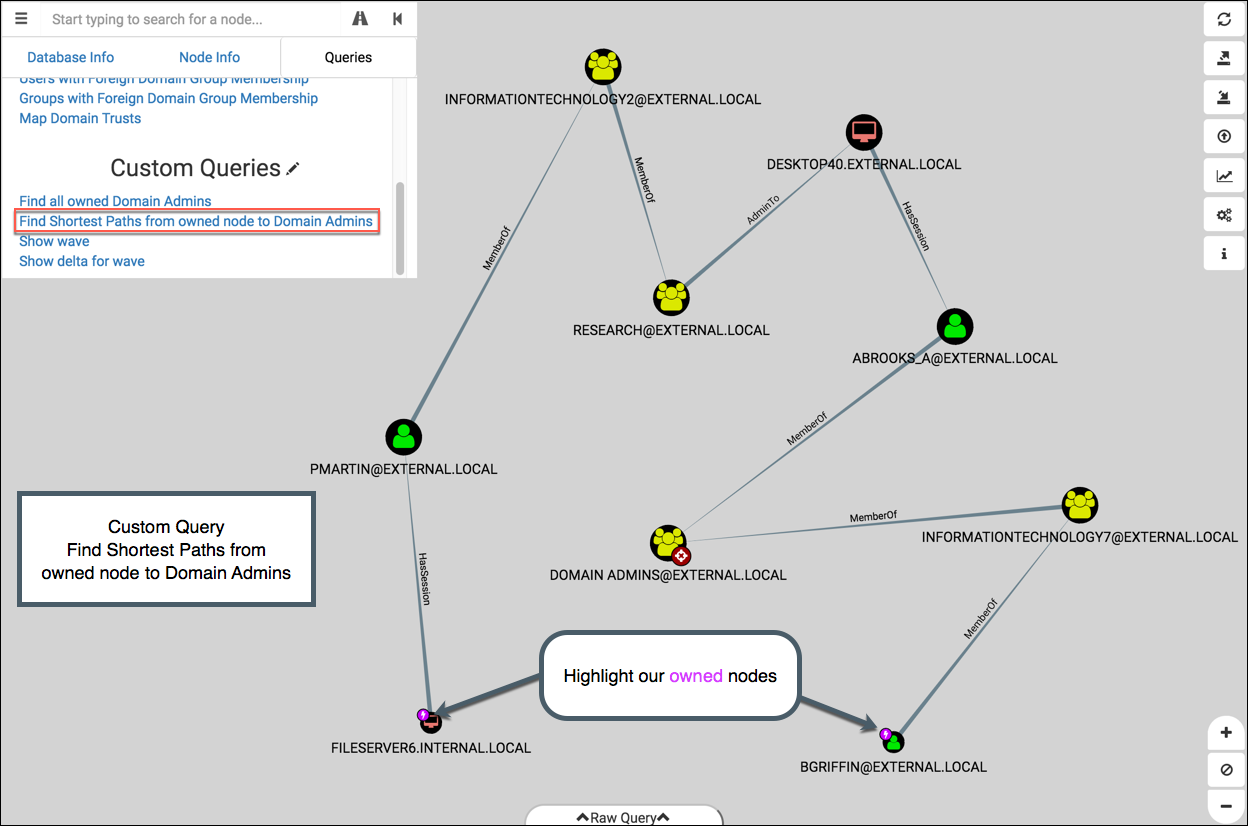
Show wave
This displays a single, isolated wave. It uses query to present the user with wave values: 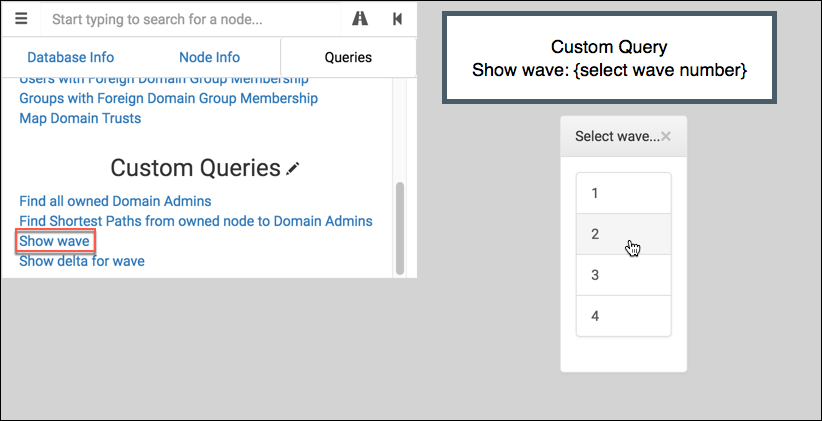
It passes the choice to onFinish to display the result. Here’s wave 2 from our example: 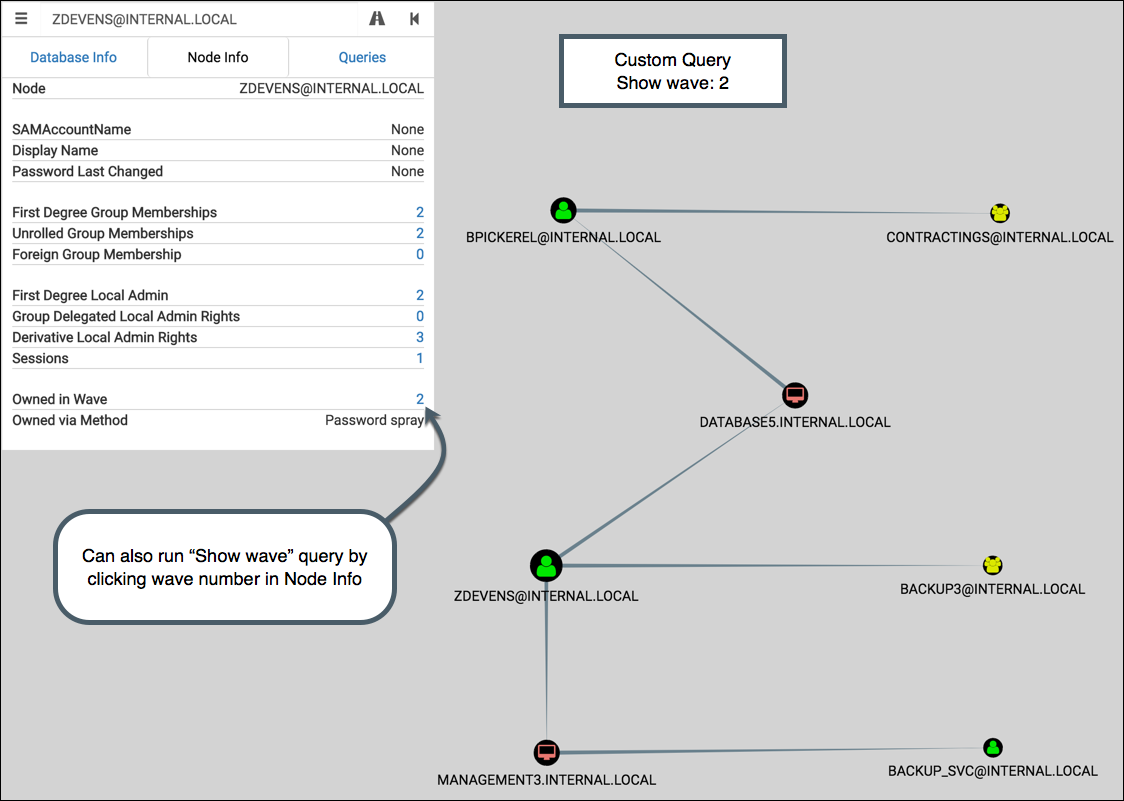
Show delta for wave
This displays all waves leading up to the selected wave, and then highlights the nodes from that wave. Like ‘Show wave’, it uses the pop-up picker for wave selection.
If wave 2 is selected, the graph shows waves 1 & 2 then highlights the nodes from wave 2: 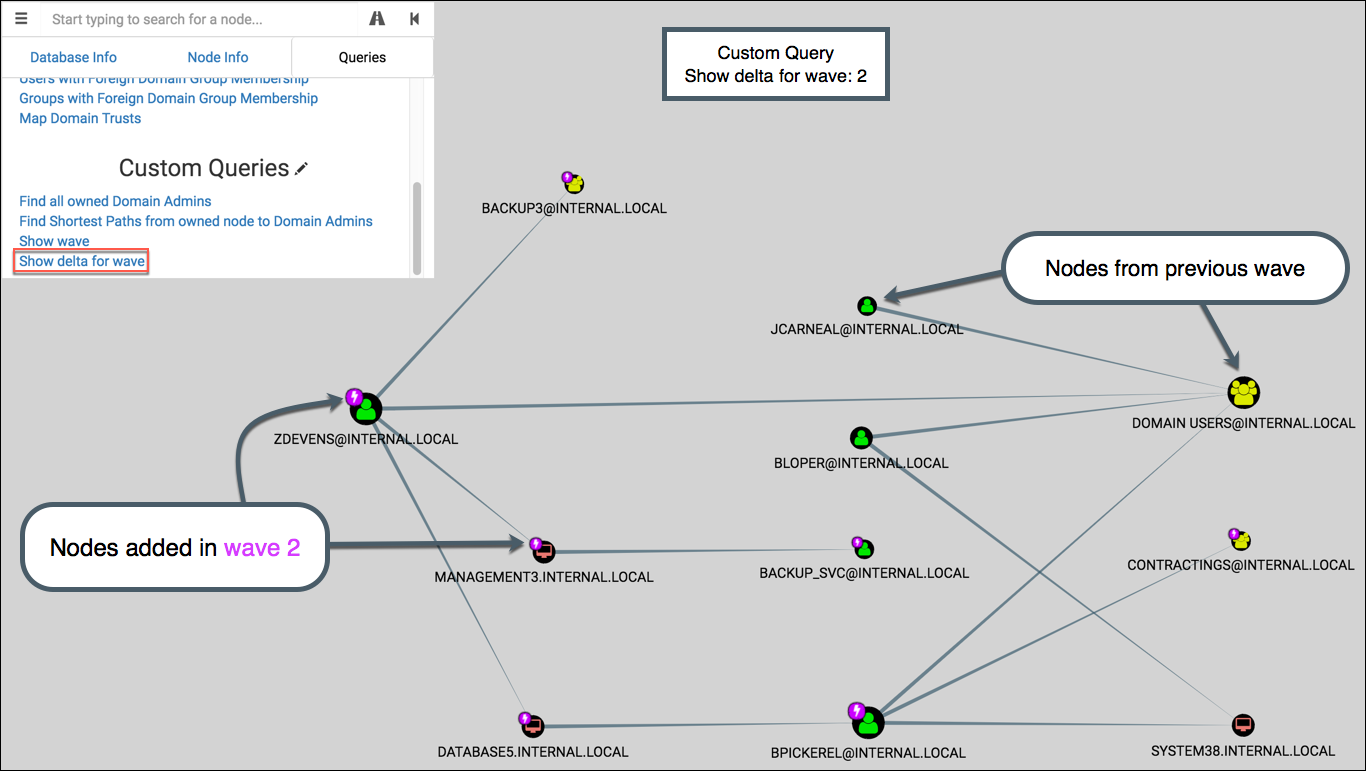
If wave 3 is selected, the graph shows waves 1-3 then highlights the nodes from wave 3: 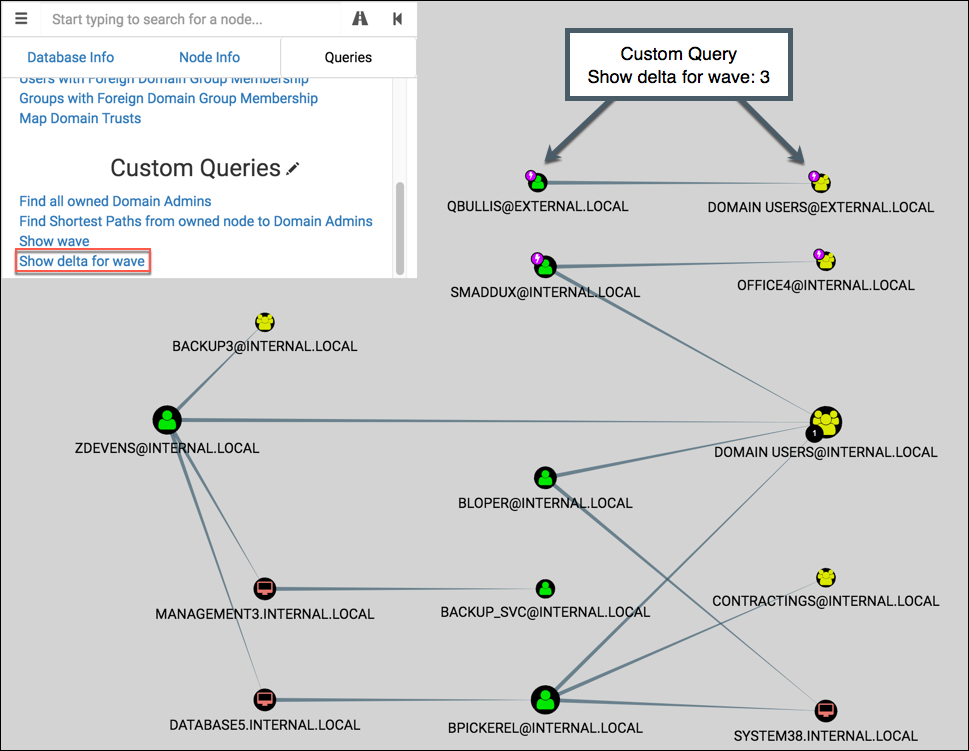
I like this graph for visualizing the changes in privilege gains as it pertains to the greater context of the penetration test. Clients like it too for the same reason – it’s an effective visual aide for explaining the collateral risk of each User or Computer you compromise.
Next Steps
Here’s a couple ideas for taking this a little further. Hopefully I’ll have time to tinker with these in the coming weeks. I’ll post updates here and on Twitter via @porterhau5. Please reach out if you want to explore some of these together! I’d really appreciate some help from those of you who are skilled with front-end development :D
- Create a new relationship (maybe “SharesPasswordWith”?) that can be used between User nodes or Computer nodes to show password reuse. A User might use the same password for their normal account and their DA account. A Computer might use the same local admin password as another Computer’s local admin. Expressing this in the form of a relationship allows us to leverage BloodHound’s pre-built queries.
- Instead of running custom queries through the Queries tab, have a slider on the main dashboard that can step through waves.
- Define a “Critical Path to Compromise” (CPTC): the exact path taken through the network to go from A to Z. Add property to nodes indicating their involvement in the CPTC. Write custom query to show this path specifically and filter out the rest of the noise. Mostly useful for presenting/explaining to client.
- Add more options when a node is right-clicked. For example, “Shortest Paths from Here” or “Add to wave X”.
- Make “Owned in Wave” and “Owned via Method” values fillable from the UI. Ditch the need for an external script to ingest data.
- General query optimizations to help with scalability & speed. The graphs can get a little messy when a DA account is obtained.
Thank you for reading!
Share
porterhau5 BLOG
BloodHound pen-testing